Create a custom Orchard Core CMS module
How to create a new custom module in Orchard Core CMS
Introduction
Main basic concept of Orchard components
To understand how to develop Orchard extension, we need to understand these terms:
Content item, Content type, Content part and Content field.
Content item
Content item is a single piece of content, often associate with a single URL on the site. Examples of content items are pages, blog posts or products. With OOP concept, you can think it is an instance of a class.
Content type
Content type is like a template of content item. Before creating a content type, we must define a content type first. With OOP concept, you can think it is a class.
Those three content item examples that we mentioned before have these content types: page, blog post and product type. In other words what we call a product is just an item of product type.
Content part
A content type is built from multiple smaller parts which called content parts. A content part is an atom of content that is enough to build a specific coherent behavior and it can be reused across content types. With OOP concept, you can think it is a set of reusable properties and we creates a new content type from multiple content parts.
Example of content parts are:
- Title part for providing a title to a content item
- Autoroute part for proving a custom URL to a content item.
- HtmlBody part for providing an HTML Body to a content item.
Content field
A Content field is a piece of information that can be added to a content type. It has a name and a type that is specific to a content type. A content type can have multiple same content fields with but can have only one unique content part.
For example, a product content type can have a text field representing its SKU, a numeric field representing its price, and another numeric field representing its weight. Each of these fields probably only makes sense on a product type.
How content part, content type and content item work together
graph TB content-parts["content part A <br/> content part B <br/> content part C <br/> (each part is similar to a set of properties in OOP)"] -->|Combine content parts to define a new content type.| content-type["content type <br/> (similar to a class in OOP)"] content-type -->|Create a new content item from a content type.| content-item["content item <br/> (similar to an instance in OOP)"]Create a custom module
Define a new content type
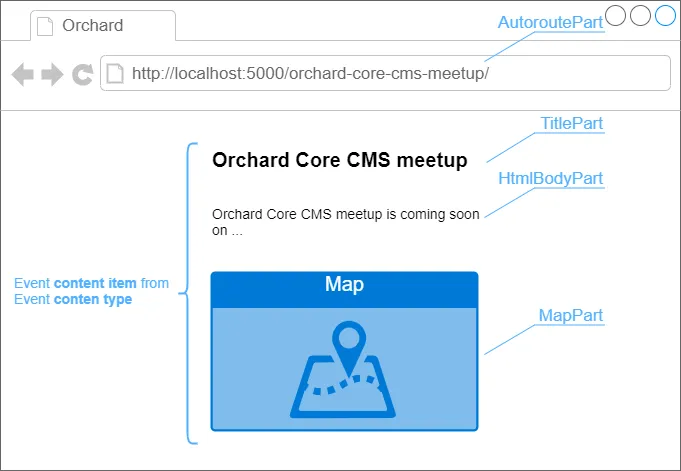
In our example, we want to create a web page to show an event information. The page will have the following information:
- A custom friendly URL from event’s title
- Event’s title
- HTML Body for event details
- Map for event’s location
Therefore, we will create a new Event content item from Event content type. Let’s define our Event content type. It will consist of these parts:
- Autoroute part
- Title part
- HtmlBody part
- Map part
Autoroute, Title, HtmlBody are existing content parts in Orchard CMS. They are in OrchardCore.Autoroute, OrchardCore.Title, OrchardCore.Html projects (modules) respectively. However, we don’t have a built-in Map part so we need create a new one.
Create new projects from dotnet tool
Let’s create a new module for Map part.
- A module is a set of extensions for Orchard that are grouped under a single sub-folder of the OrchardCore.Modules.Cms directory.
- Actually it is just a ASP.NET Core MVC project.
- We don’t need to create it manually, we can use dotnet tool to create a module with a scaffold content part for us.
- We will create a new module by following steps.
Install the latest version of .NET
- Follow this instruction to install .NET.
- Then, use the following command to install Orchard Core CMS project template.
Terminal window $ dotnet new -i OrchardCore.ProjectTemplates::1.5.0 - Note Add
--nuget-source https://nuget.cloudsmith.io/orchardcore/preview/v3/index.jsonoption, if a template is from preview source.
Create the main project from a template
- Create a folder that you want to save OrchardCore CMS source code and CD to it.
- In this example, I will use
orchard-example/srcto store all source code. - Then, use dotnet command to create Orchard Core CMS project with name
OrchardExample.Cms.Terminal window $ mkdir -p orchard-example/src$ cd orchard-example/src$ dotnet new occms --name OrchardExample.Cms --framework net8.0 - Note
OrchardExample.Cmsis our main web project and it referencesOrchardCore.Application.Cms.Targetspackage.
Create the module project from a template
- Next, create a folder name
Modulesinsideorchard-example/srcfor adding a new module. Then CD to inside the folder that we have just created. - Create a custom module with dotnet tool.
- You can create a new module with any name that represents a feature that you are going to build.
- In this example, we are going to create
OrchardExample.Mapmodule for providingMap partwhich can be used in an event content type.Terminal window $ cd orchard-example/src$ mkdir Modules$ cd Modules$ dotnet new ocmodulecms --name OrchardExample.Map --AddPart True --PartName Map - Note Part suffix is appended automatically to the end of the supplied PartName.
Reference OrchardExample.Map to OrchardExample.Cms project
- CD back to
OrchardExample.Cmsfolder. - Then reference
OrchardExample.Mapwith dotnet command.Terminal window $ cd ../OrchardExample.Cms$ dotnet add reference ../Modules/OrchardExample.Map/OrchardExample.Map.csproj
Use IDE and build the project
Open a project with VS Code
- CD to the root of the project which contains
OrchardExample.CmsandModulesfolders. - Open the project with VS Code.
Terminal window code . - Current project’s file structure:
orchard-example/|--OrchardExample.Cms/|--Modules/|--OrchardExample.Map/
Add preview package source
- At root of the project create
nuget.configfile. - Add the following code to the file.
<?xml version="1.0" encoding="utf-8"?><configuration><packageSources><clear /><add key="NuGet" value="https://api.nuget.org/v3/index.json" /><add key="OrchardCorePreview" value="https://nuget.cloudsmith.io/orchardcore/preview/v3/index.json" /></packageSources><disabledPackageSources /></configuration>
- Waring We do not suggest you to use the dev packages in production.
Restore all Nuget packages and run a website
- Use VS Code integrated terminal by typing ctrl+`
- CD to
OrchardExample.Cmsand run the following command.dotnet restore - Note Please make sure you save all changes before running the command.
- Wait until we have restored all packages successfully.
- Then run:
dotnet watch run
Set up new Orchard CMS website
- Open a browser and navigate to http://localhost:5000
- You will find Orchard Core CMS setup page.

- Tip you can put chrome://flags/#allow-insecure-localhost in Chrome’s address bar, enable that setting and relaunch Chrome to not show warning message on localhost.
- Set up a new website with any name you like and use Blog recipe.
- Use SQLite to simplify our project. For using it as production database, please check https://www.sqlite.org/whentouse.html.
- Note If you are going to use other database type, you need to create an empty database before setting up a website.**.
- Set admin username and email to what ever you want.
- Click
Finish setupbutton. - You will be redirected to home page.
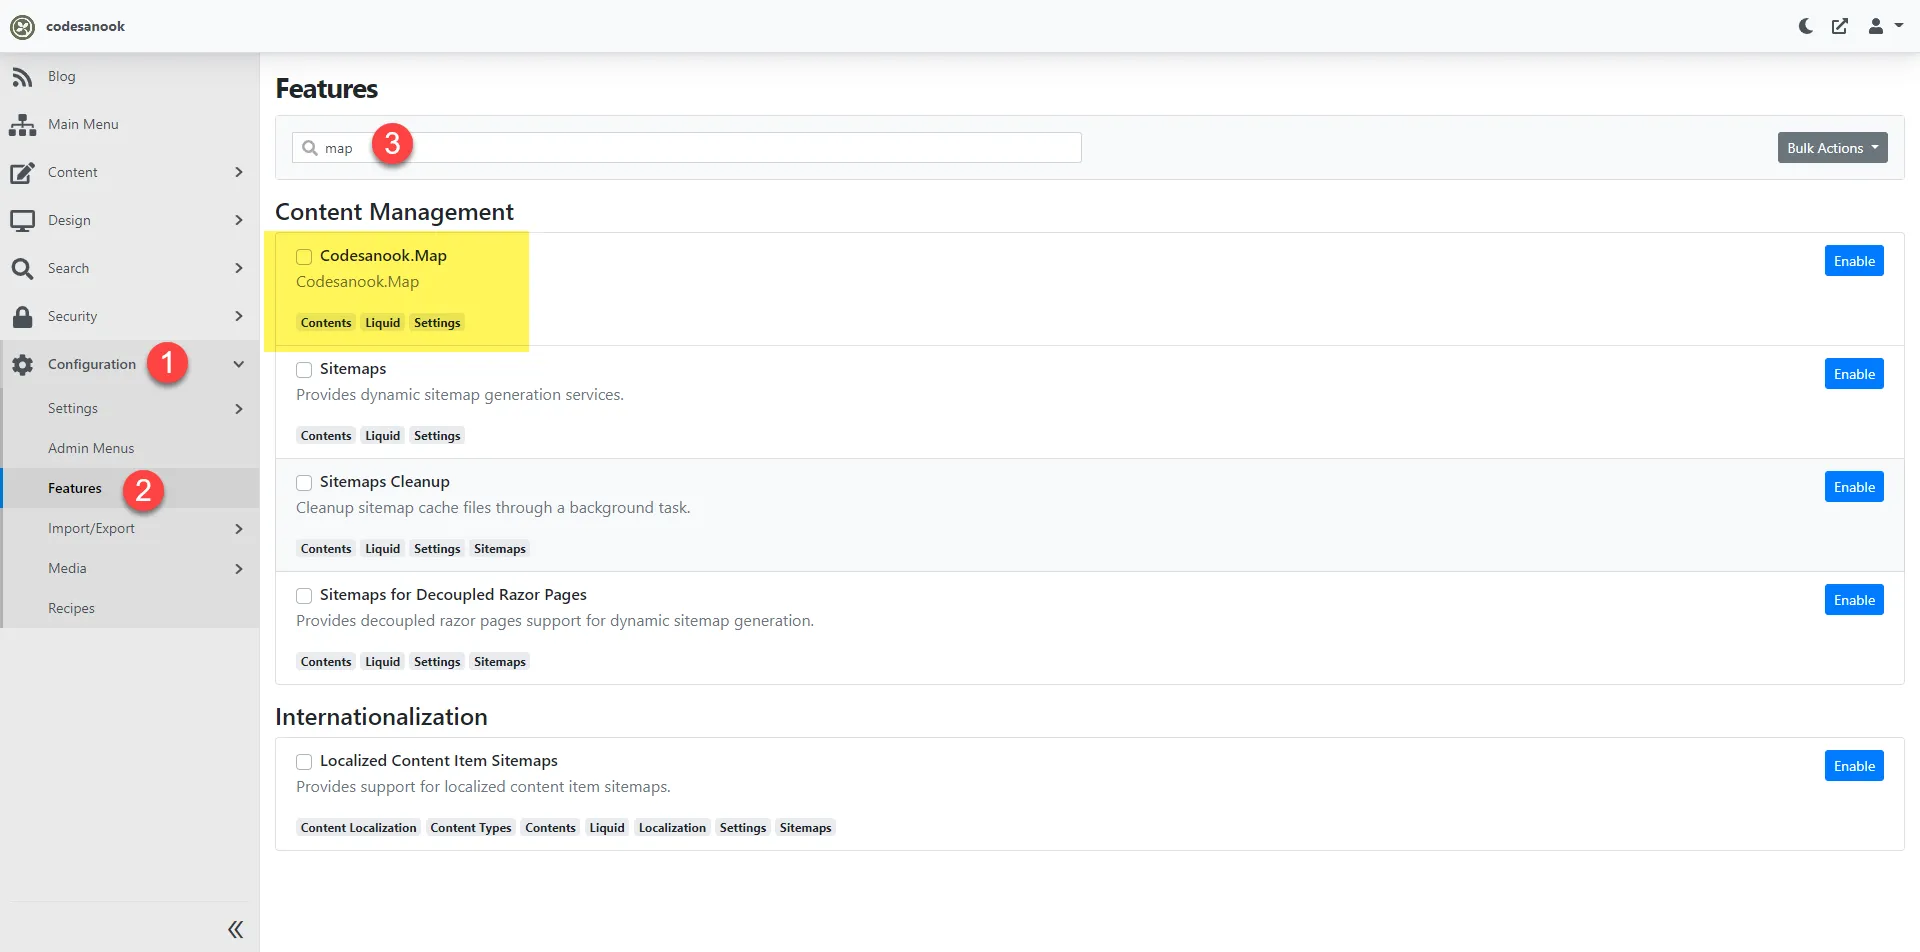
- Go to admin panel by navigating to http://localhost:5000/admin and log in with your admin’s username and password.
- On the left-hand side menu of admin panel, go to
Configuration>Features. - Search for map and you will find
OrchardExample.Maphas not been enabled yet. - We will be back to enable it later after we have updated our module and our Map part is ready to use.
Update Map part
- You can update a manifest file as you like. I will only change an author and website URL.
- Edit
Manifest.csin OrchardExample.Map project to:
using OrchardCore.Modules.Manifest;
[assembly: Module( Name = "OrchardExample.Map", Author = "OrchardExample Team", Website = "https://www.OrchardExample.com", Version = "0.0.1", Description = "OrchardExample.Map", Dependencies = new[] { "OrchardCore.Contents" }, Category = "Content Management")]- Go to the Models folder in OrchardExample.Map project
(Modules/OrchardExample.Map/Models), you will find that we have the generatedMapPart.csfile. - This file is our main model.
- It is a content part that we will add new features.
- Add new properties to the model and it will look like this.
using OrchardCore.ContentManagement;
namespace OrchardExample.Map.Models{ public class MapPart : ContentPart { public double Latitude { get; set; } public double Longitude { get; set; } }}- Please note that a content part derives from ContentPart class.
Update ContentPartDisplayDriver
You can think ContentPartDisplayDriver class is a mini MVC controller for displaying or editing our content part.
To use it, we create a derived class from ContentPartDisplayDriver with a generic type of our content part.
- Go to
Driversfolder and you will find we haveMapPartDisplayDriver.cs. - There are three main methods that we need to override:
- Display/DisplayAsync for creating a shape to render a part in frontend
- Edit/EditAsync for creating a shape to render a part as editing form
- Update/UpdateAsync for updating a part with a new value
- All methods have pairs of async method that we can override.
- Before updating our ContentPartDisplayDriver, we need to understand a content shape.
What is a content shape?
- It is a small object that contains all the information required in order to display on the screen.
- Before showing a content item, everything get mapped into a tree of shapes that are sort of abstract representation of the final page.
- The advantage of such trees of shapes is that any module can modify existing shapes or create a new one.
Explore the auto generated MapPartDisplayDriver.cs
Here is the auto generated code to create create a MapPart Shape.
public override IDisplayResult Display(MapPart part, BuildPartDisplayContext context){ return Initialize<MapPartViewModel>( GetDisplayShapeType(context), m => BuildViewModel(m, part, context) ) .Location("Detail", "Content:10") .Location("Summary", "Content:10");}- We use
Initializemethod with a generic of view modelMapPartViewModelto create IDisplayResult - We use
GetDisplayShapeTypeto resolve MapPart shape for showing a map in a details page and MapPart_Summary shape for showing a map in a summary page or list view page. - Orchard uses convention to bind a view template (*.cshtml or *.liquid) and shape name.
- Given our shape type MapPart, it will use MapPart.cshtml or MapPart.liquid in Views folder to render a shape.
- Then, we construct a Lambda to create a view model with
BuildViewModelmethod. MapPartViewModelview model will be passed as a model to a template of a shape.- Orchard knows how to render it correctly depend on display type
DetailsorSummary. - We also set a position to display a shape at Content zone position 10.
- Next, we are going to make our MapPart ready to render in details and summary page.
Update MapPartViewModel
- Open MapPartViewModel.cs in
Modules/OrchardExample.Map/ViewModels/MapPartViewModel.csand update the content as following:
using Microsoft.AspNetCore.Mvc.ModelBinding;using OrchardCore.ContentManagement;using OrchardExample.Map.Models;
namespace OrchardExample.Map.ViewModels{    public class MapPartViewModel    {        public double Latitude { get; set; }        public double Longitude { get; set; }
        [BindNever]        public ContentItem ContentItem { get; set; }
[BindNever] public MapPart MapPart { get; set; } }}- Go back to
MapPartDisplayDriver.BuildViewModelmethod and update the method body as following:
private void BuildViewModel(MapPartViewModel model, MapPart part){ model.Latitude = part.Latitude; model.Longitude = part.Longitude; model.MapPart = part; model.ContentItem = part.ContentItem;}-
As you can see, we set the part properties to view model’s properties.
-
Reference the part itself to MapPart property.
-
Reference a content item that the current MapPart belongs to, to ContentItem property.
-
Update
MapPartDisplayDriver.BuildViewModelto use a new signature ofBuildViewModelmethod.
public override IDisplayResult Display(MapPart part, BuildPartDisplayContext context){ return Initialize<MapPartViewModel>( GetDisplayShapeType(context), m => BuildViewModel(m, part) ) .Location("Detail", "Content:10") .Location("Summary", "Content:10");}Edit MapPart.cshtml
- We will use MapPart.cshtml as view template of a shape in details page.
- Rename MapPart.liquid in
Modules/OrchardExample.Map/Viewsto MapPart.cshtml. - We use Razor instead of Liquid template.
- Update the content of MapPart.cshtml to:
@model MapPartViewModel@{    // From https://developers.google.com/maps/documentation/javascript/adding-a-google-map    const string apiKey = "YOUR_API_KEY";}
<!--The div element for the map --><div id="map"></div>
<style type="text/css">    /* Set the size of the div element that contains the map */    #map {        height: 400px;        /* The height is 400 pixels */        width: 100%;        /* The width is the width of the web page */    }</style>
<script src="https://maps.googleapis.com/maps/api/js?key=@apiKey&callback=initMap&libraries=&v=weekly" defer></script><script>    // Initialize and add the map    function initMap() {        // The location of Uluru        const uluru = { lat: @Model.Latitude, lng: @Model.Longitude };        // The map, centered at Uluru        const map = new google.maps.Map(            document.getElementById("map"),            {                zoom: 4,                center: uluru,            }        );
// The marker, positioned at Uluru const marker = new google.maps.Marker({ position: uluru, map: map, }); }</script>-
Learn how to get Google map API key from https://developers.google.com/maps/documentation/javascript/adding-a-google-map#step_3_get_an_api_key.
-
After you have got the key, change “YOUR_API_KEY” to your Google map API key.
-
Update content of MapPart_Summary.liquid that use for summary page to:
<a href="{{ Model.ContentItem | display_url }}>{{ Model.ContentItem.ContentItemId }}</a>Make MapPart editable
- Open MapPartDisplayDriver.cs and update Edit method to:
public override IDisplayResult Edit(MapPart part, BuildPartEditorContext context){ return Initialize<MapPartViewModel>( GetEditorShapeType(context), m => BuildViewModel(m, part) );}- This method creates a MapPart_Edit shape that will use
MapPart_Edit.cshmlorMapPart.Edit.cshmlas a view template for rendering Map part in edit page. - Next, open existing MapPart.Edit.cshtml or MapPart_Edit.cshtml and update the content to:
@model MapPartViewModel
<h3>Location</h3><div class="form-group" asp-validation-class-for="Latitude">    <label asp-for="Latitude">        @T[nameof(Model.Latitude)]    </label>    <input asp-for="Latitude" class="form-control" /></div>
<div class="form-group" asp-validation-class-for="Longitude">    <label asp-for="Longitude">        @T[nameof(Model.Longitude)]    </label>    <input asp-for="Longitude" class="form-control" /></div>
Update UpdateAsync method
- Open MapPartDisplayDriver.cs and update
UpdateAsyncmethod to:
public override async Task<IDisplayResult> UpdateAsync(MapPart model, IUpdateModel updater){ await updater.TryUpdateModelAsync( model, Prefix, t => t.Latitude, t => t.Longitude ); return Edit(model);}- This method uses
updater.TryUpdateModelAsyncto update our Map part and save it to a database by taking HTTP form data as input. - We explicit update only Latitude and Longitude properties.
- It returns the shape result of Edit method which is MapPart_Edit shape.
- Therefore, this method will end up with returning the edit page with a new content data.
Full content of MapPartDisplayDriver.cs
using System.Threading.Tasks;using OrchardCore.ContentManagement.Display.ContentDisplay;using OrchardCore.ContentManagement.Display.Models;using OrchardCore.ContentManagement.Metadata;using OrchardCore.DisplayManagement.ModelBinding;using OrchardCore.DisplayManagement.Views;using OrchardExample.Map.Models;using OrchardExample.Map.Settings;using OrchardExample.Map.ViewModels;
namespace OrchardExample.Map.Drivers{    public class MapPartDisplayDriver : ContentPartDisplayDriver<MapPart>    {        private readonly IContentDefinitionManager _contentDefinitionManager;
        public MapPartDisplayDriver(IContentDefinitionManager contentDefinitionManager) =>            _contentDefinitionManager = contentDefinitionManager;
        public override IDisplayResult Display(MapPart part, BuildPartDisplayContext context)        {            return Initialize<MapPartViewModel>(                    GetDisplayShapeType(context),                    m => BuildViewModel(m, part)                )                .Location("Detail", "Content:10")                .Location("Summary", "Content:10");        }
        public override IDisplayResult Edit(MapPart part, BuildPartEditorContext context)        {            return Initialize<MapPartViewModel>(                GetEditorShapeType(context),                m => BuildViewModel(m, part)            );        }
        public override async Task<IDisplayResult> UpdateAsync(MapPart model, IUpdateModel updater)        {            await updater.TryUpdateModelAsync(                model,                Prefix,                t => t.Latitude,                t => t.Longitude            );            return Edit(model);        }
        private void BuildViewModel(MapPartViewModel model, MapPart part)        {            model.Latitude = part.Latitude;            model.Longitude = part.Longitude;            model.MapPart = part;            model.ContentItem = part.ContentItem;        }    }}
Update a Startup.cs of OrchardExample.Map project
- Update
Modules/OrchardExample.Map/Startup.csas the following code to simplify our Startup class:
using Microsoft.Extensions.DependencyInjection;using OrchardCore.ContentManagement;using OrchardCore.ContentManagement.Display.ContentDisplay;using OrchardCore.Data.Migration;using OrchardExample.Map.Drivers;using OrchardExample.Map.Models;using OrchardCore.Modules;
namespace OrchardExample.Map{    public class Startup : StartupBase    {        public override void ConfigureServices(IServiceCollection services)        {            services.AddContentPart<MapPart>().UseDisplayDriver<MapPartDisplayDriver>();            services.AddScoped<IDataMigration, Migrations>();        }    }}
Create an Event content type
- We have a Migrations.cs at root of the module project.
- We have generated code which already create a part for us.
- We use
contentDefinitionManager.AlterPartDefinitionto create a part with a name matches our part model. - Since OrchardCore stores data of MapPart in JSON document format, we don’t need to define any tables/columns like Orchard version 1. With this, our migration is much simpler.
- Update content of Migrations.cs to:
using OrchardCore.ContentManagement.Metadata.Settings;using OrchardCore.ContentManagement.Metadata;using OrchardCore.Data.Migration;using OrchardExample.Map.Models;
namespace OrchardExample.Map{ public class Migrations : DataMigration { IContentDefinitionManager _contentDefinitionManager; public Migrations(IContentDefinitionManager contentDefinitionManager) => _contentDefinitionManager = contentDefinitionManager;
public int Create() { _contentDefinitionManager.AlterPartDefinition( nameof(MapPart), part => part .Attachable() .WithDescription("Provide a map part for a content item") );
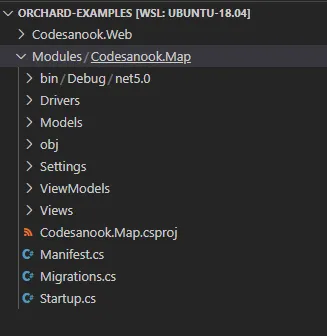
return 1; } }}Remove unused files from OrchardExample.Map project
- Remove Handlers folder and files inside, we don’t need them for our project.
- Remove MapPartDisplayDriver.GetMapPartSettings method.
- Remove Settings folder that we don’t use setting in this example.
- Remove MapPartSettings.Edit which a view of content part setting.
- Remove Controller folder.
- Remove Views/Home folder.
screenshot of the current project structure
Enable the module that contains Map part
- Now we have a MapPart is ready to use.
- In our example, we are going to create the Event content type.
- We can attach the Map content part to the content type via code or UI in the admin panel.
- To simplify our example, we will start by using admin panel.
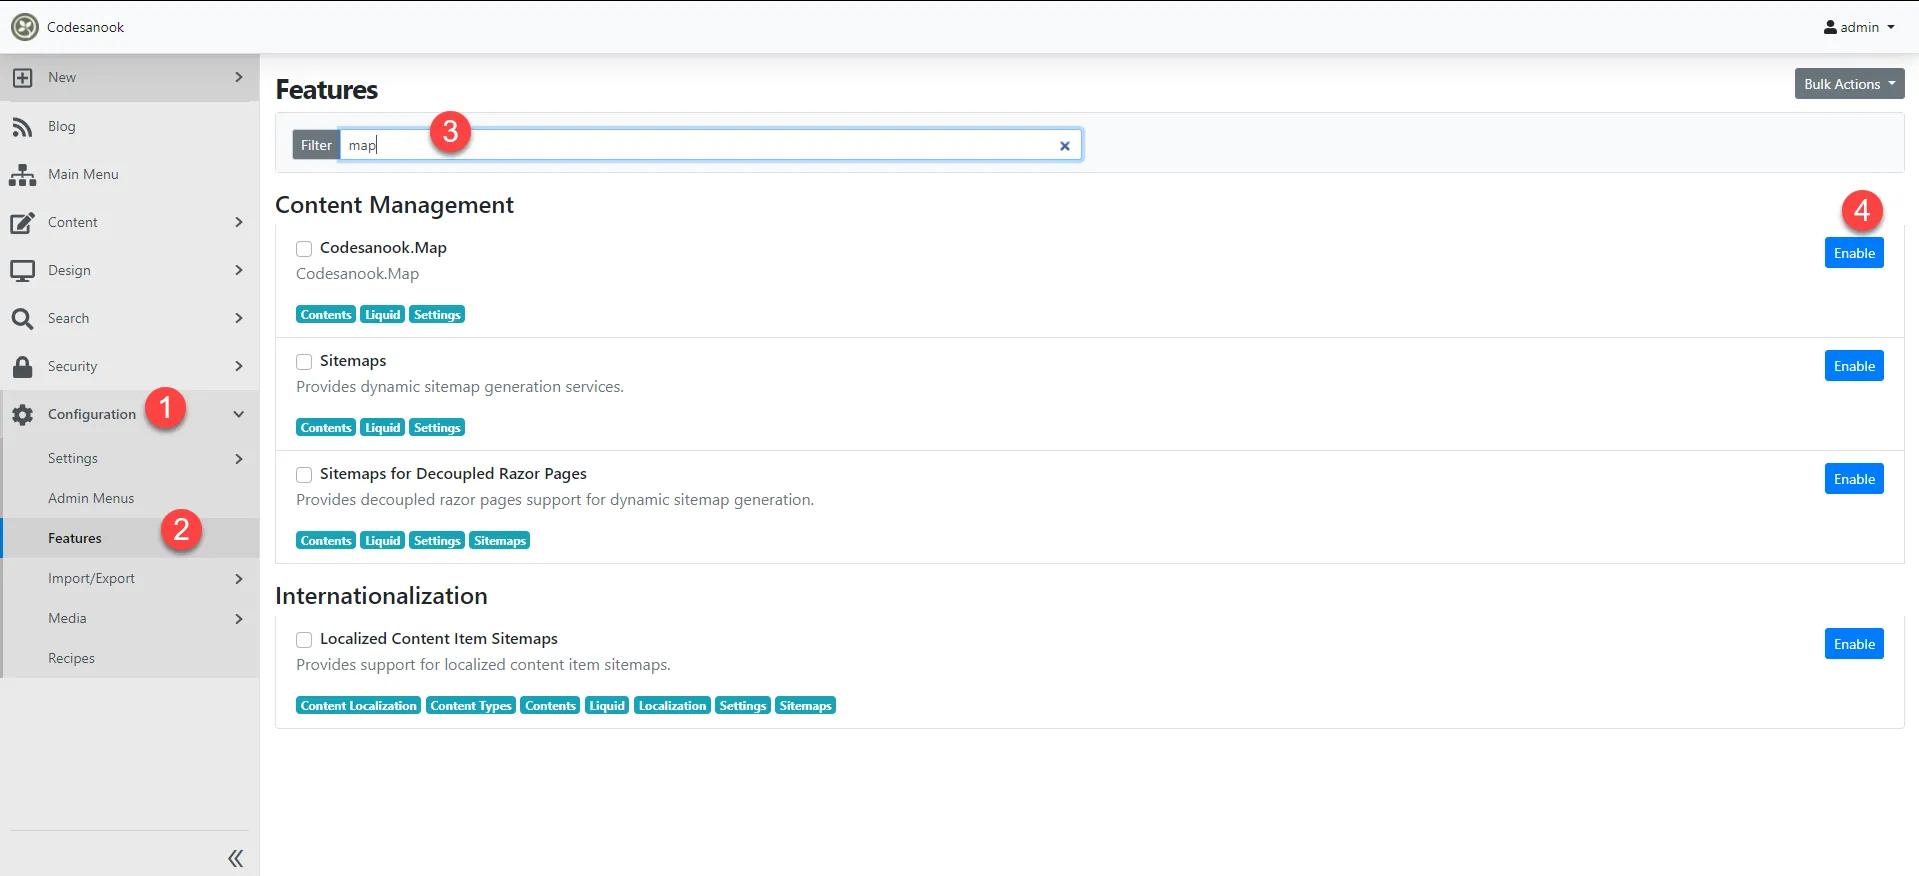
- Before using Map part, we need to enable OrchardExample.Map module.
- Go to admin panel, on left-hand side menu:
- Click Configuration.
- Click Features.
- Search “map”.
- Click
Enablebutton.
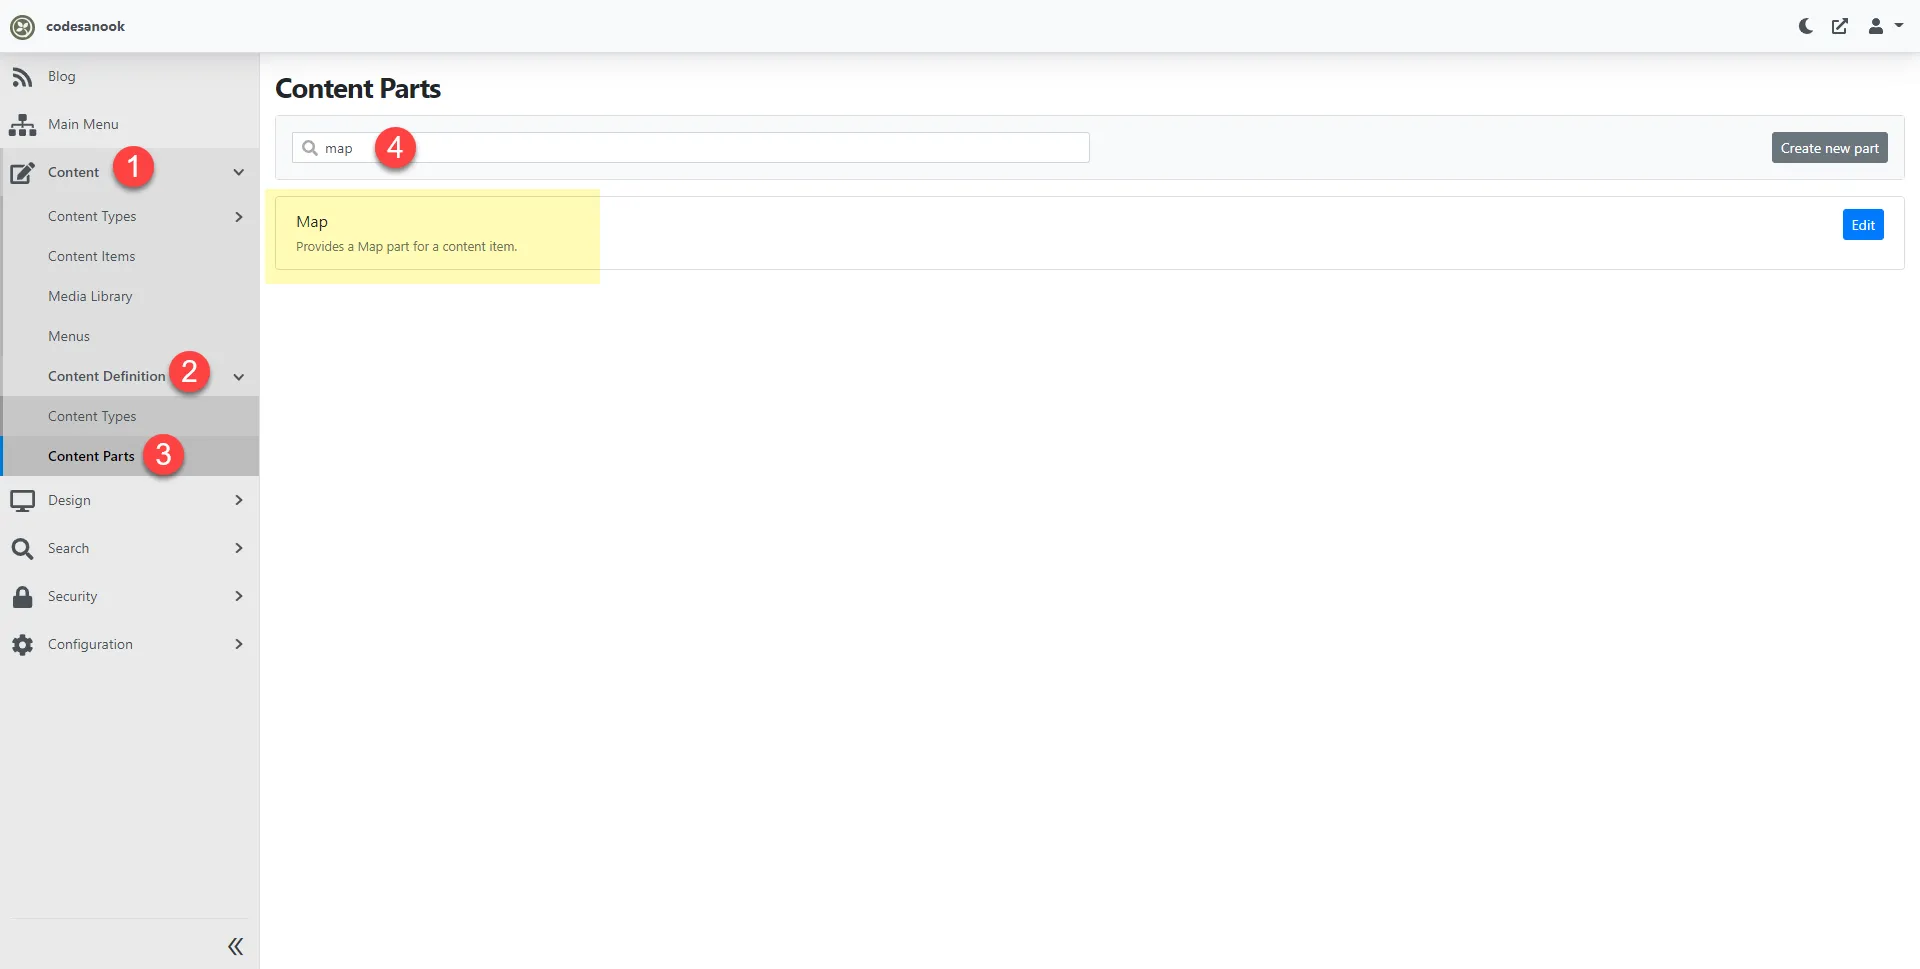
- Verify if our Map part is ready to use:
- Click Content menu.
- Click Content Definition.
- Click Content Parts.
- Search “map” and verify if you have Map content part.
content part is ready to use
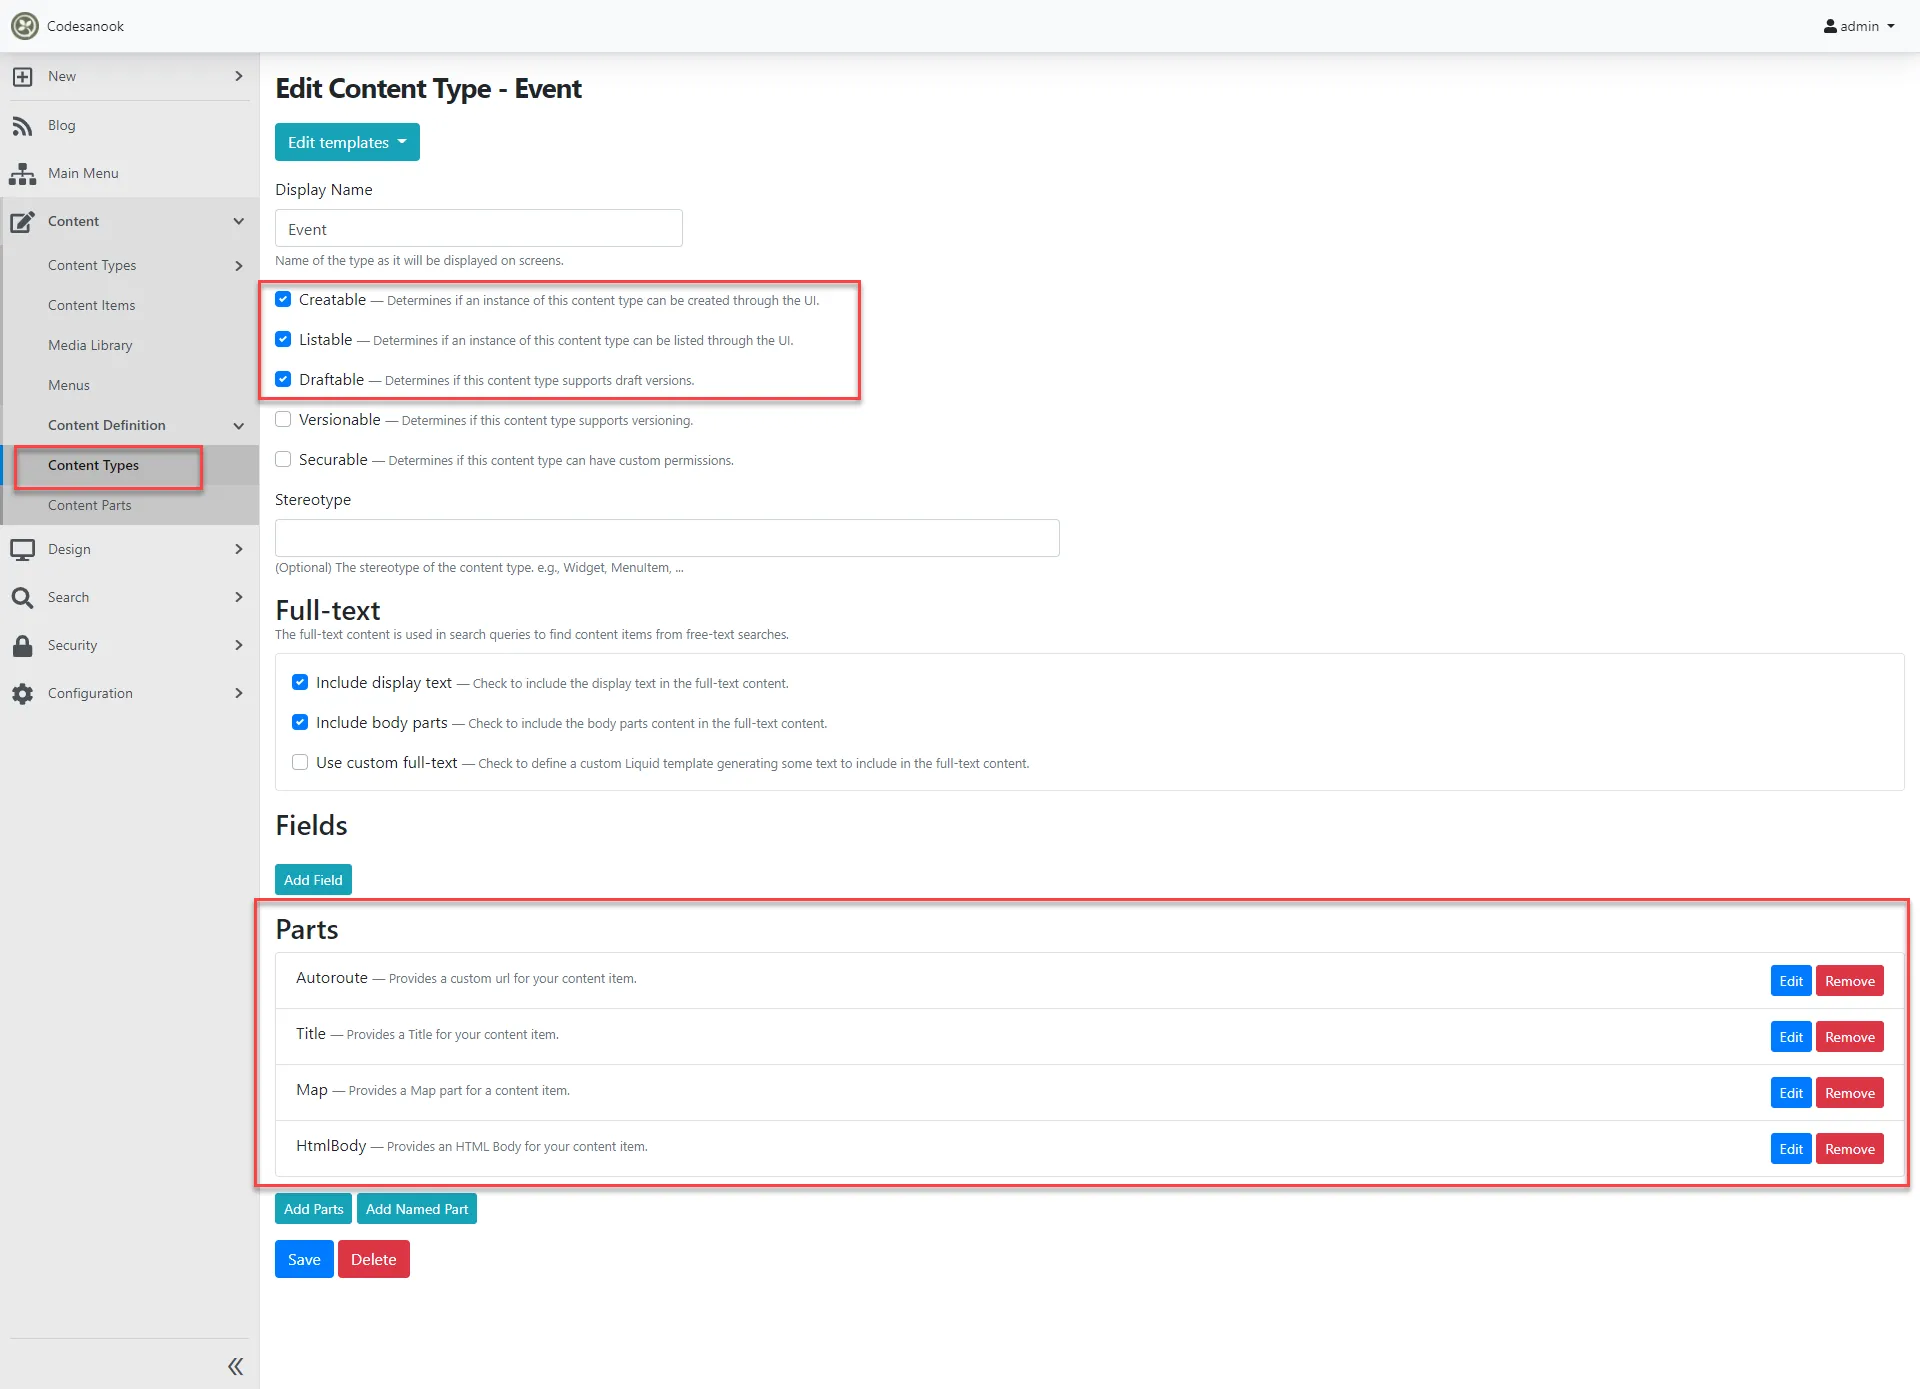
Create an Event content type and attach the Map part
- In admin panel.
- On the left-hand side menu.
- Click Content > Content Definition > Content Types.
- On top right corner of the screen, click
Create new typebutton > Name it “Event” > ClickCreatebutton. - You will be redirected to a page to add parts to Event content type.
- Check following parts:
- Autoroute
- Title
- Html Body
- Map
- Click Save button.
- Now you are redirected to edit content type page.
- Keep Creatable, Listable Draftable checked.
- At the button of the screen, you can sort the order of parts by drag and drop.
- In addition, you can edit Event content type later by going to Content > Content Types > search for “Event” and then click
Editbutton.
screenshot of Event content type definition
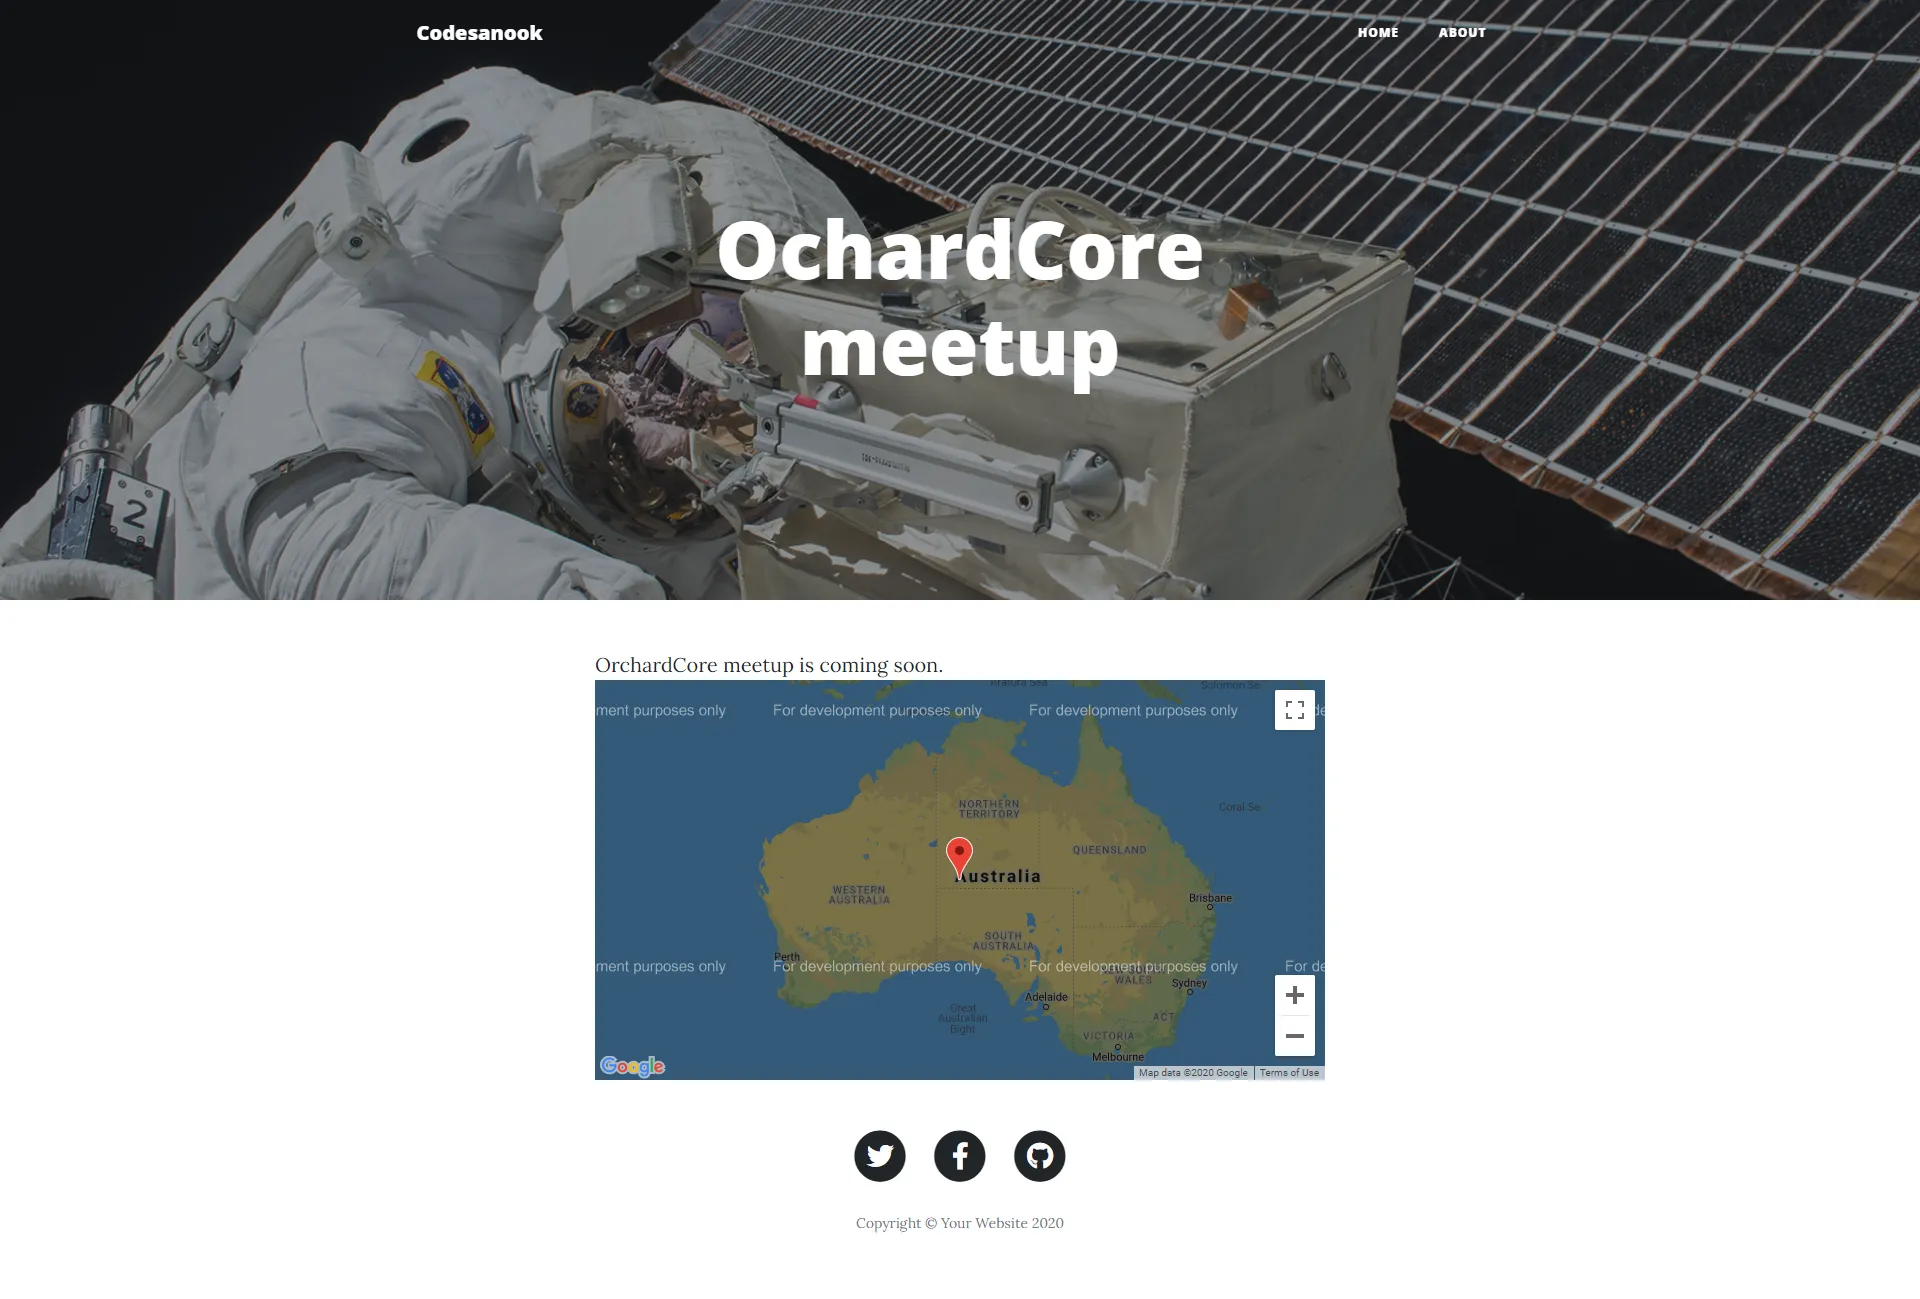
Create a new Event content item
-
On left-hand side menu > Click Content menu > Content Items.
-
Click New button at top right of the screen > Select Event.
-
Then you will see a form to create a new event, fill information to all fields
- Title
- HtmlBody content (It uses shortcode by default)
- Latitude e.g. -25.344
- Longitude e.g. 131.036
-
Click Publish button.
-
Then the event that you have just created will show in the list.
-
Click View button to view the event on frontend.
screenshot of event content item details page
Summary
I hope this tutorial will help you understand how to create a custom OrchardCore module and content part. Thanks.