Setup VS Code Arduino extension
How to setup VS Code Arduino extension for Windows OS
Install Chocolatey
- Open a new PowerShell session with with administration permission.
- Install Chocolatey with the following command:
Set-ExecutionPolicy Bypass -Scope Process -Force; [System.Net.ServicePointManager]::SecurityProtocol = [System.Net.ServicePointManager]::SecurityProtocol -bor 3072; iex ((New-Object System.Net.WebClient).DownloadString('https://chocolatey.org/install.ps1'))- Wait for a while for the command to complete and check if you are ready to use Chocolatey with the following command:
choco -v- If you see a version number, it means you have installed Chocolatey successfully.
Install Arduino IDE
- Continue the current PowerShell session or open a new session with administration permission if you have closed it.
- Execute the following command to install Arduino IDE:
choco install arduino -yInstall VS Code Arduino extension
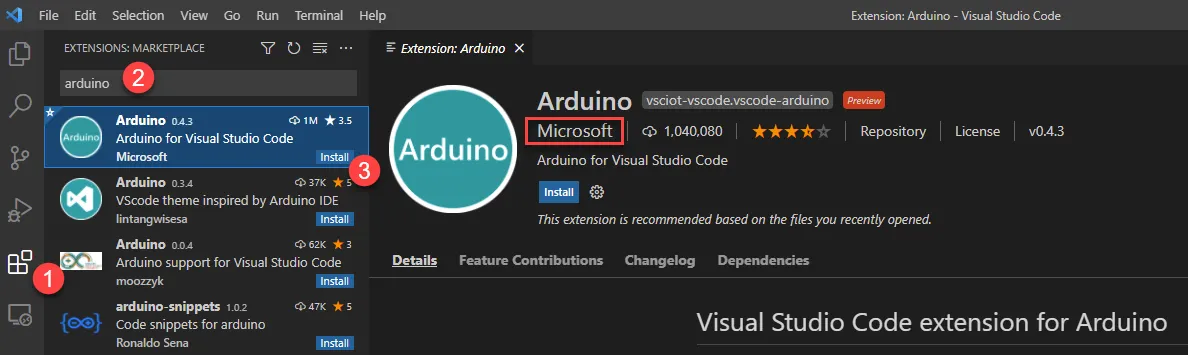
- Open VS Code, click Extensions icon
- Search “arduino”
- Select Arduino extension from
Microsolfand click install.
Create a new Arduino project
- Press
ctrl+shift+p, typearduino: examples. Then press enter to select. - Expand Built-in Examples > 01.Basics.
- Click
Blink. - VS will open a new window with LED blink project.
- An auto generated source code is saved at
~/Documents/Arduino/generated_examples/Blink.
Connect Arduino board
-
Connect your Arduino board to a computer.
-
Wait until driver installation complete.
-
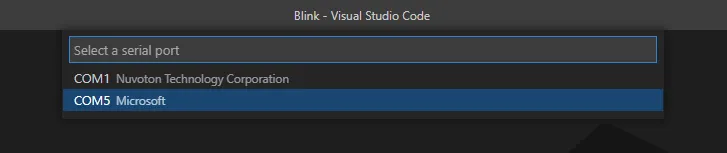
In this example, I use
Arduino Unoand is connected via COM5 port. -
In VS Code, change a serial port by pressing
ctrl + shift p. Then typeArduino: Select Serial Portand press enter to select. -
Select a serial port that connects to Arduino.
-
In VS Code, change Arduino board by pressing
ctrl + shift + p. Then typeArduino: Change Board Typeand press enter to select. -
Select your connected Arduino board.

Fix IntelliSense
- Normally, after you have set a serial port and a board type correctly, VS Code automatically analyzes source code and creates
c_cpp_properties.jsonwith a configuration namedArduinoand IntelliSense should work. - Optionally, if IntelliSense does not work, we need to run code analysis manually by pressing
alt + ctrl + i. Alternatively, typeArduino: Rebuild IntelliSense Configuration. Then press enter to select. - At status bar (bottom right conner), you should find a configuration named Arduino and other connection values. These values, you can click to change.
![]()
Example code of Blink project
- Open Blink.ino, you should find source code as following:
// the setup function runs once when you press reset or power the boardvoid setup() {  // initialize digital pin LED_BUILTIN as an output.  pinMode(LED_BUILTIN, OUTPUT);}
// the loop function runs over and over again forevervoid loop() {  digitalWrite(LED_BUILTIN, HIGH);   // turn the LED on (HIGH is the voltage level)  delay(1000);                       // wait for a second  digitalWrite(LED_BUILTIN, LOW);    // turn the LED off by making the voltage LOW  delay(1000);                       // wait for a second}
Upload source code to Arduino board
- Press
ctrl + shift + p. Then typeArduino: Uploadand press enter to select. - You will see logging messages in OUTPUT window. Wait for a while until you see
[Done] Uploading sketch 'Blink.ino'.
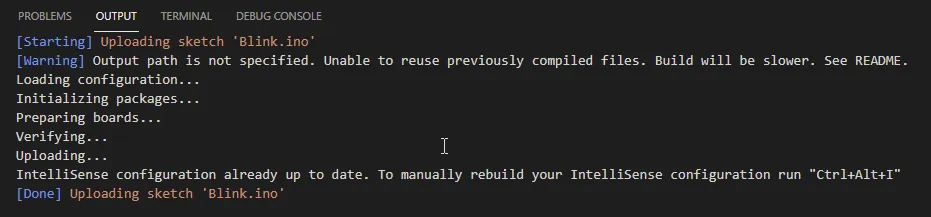
A few seconds later, you should see LED on a board starts to blink.
